Thursday, December 5, 2013

SDL Tridion 2013 SP1 Released!!

As usual I try to keep up with SDL Tridion product as best as possible. Pretty excited that SDL Tridion 2013 SP1 came out this week!

Just wanted to try it out today installing the basic Content Manager portion and see what has changed.

Here goes!

STEP 1

Choose what feature you want to install. Looks like "Context Expressions" is something new here


STEP 2

Installing the missing prerequisites (nothing changed)


STEP 3

Enter MTSUser Account (nothing changed)


STEP 4

Connect to database. In addition to the normal SQL user, you can actually use Windows Authentication now!


STEP 5

This step is optional but we use SDL WorldServer for our translation services. There's a new selection called SDL BeGlobal which is a new SDL automated translation service that's hosted in the cloud.


STEP 6

Installing SDL Tridion (nothing changed)


STEP 7

Select your license file (nothing changed)


STEP 8

Get ready to install (nothing changed)


STEP 9

Installing......


STEP 10

DONE!!


Upon first access, I am quite impressed! I am immediately greeted with a dynamically spinning "Loading" page.


Here's the home screen of the completely new dashboard in Tridion 2013 SP1


Finally, here's the new content explorer screen.


Overall, I am quite impress with this version of Tridion. Good job R&D team!!

Tuesday, April 16, 2013

Using Tridion PurgeAppData Tool

Yesterday I experienced a strange issue where the publication property cannot be accessed due to the following error:

The item tcm:0-167-65568 does not exist


Seems like this group ID was somehow removed or corrupted.

Good thing, there is a solution to purge the application data tied to this publication.

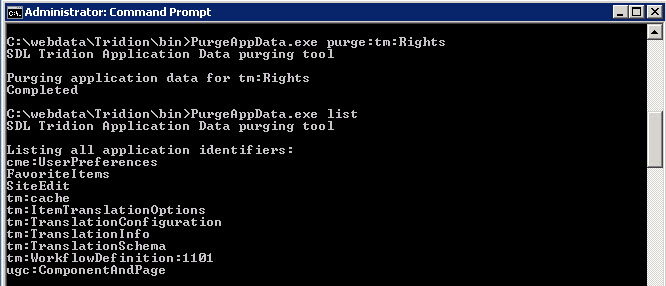
Out of the box, Tridion comes with a tool in the Tridion\bin folder called "PurgeAppData.exe". Using this tool we can purge old app data specific to permission, translation configurations, workflow, etc....

By going into CMD, and doing a PurgeAppData.exe list command, I can see all the app data in the CM.

The one I wanted to purge in this scenario is the tm:Rights app data.

The command would be: PurgeAppData.exe purge:tm:Rights


After purging, I can now access the publication property again =)

Wednesday, April 3, 2013

Tridion 2013 GA is out!!

Was able to get my hands on the latest version of Tridion =)


Installation Updates:

  • No more DatabaseManager.exe (Replaced by PowerShell scripts)
  • No more Tridion_cm_log database (never understood why this was required from the start)
  • Windows Server 2012 and SQL Server 2012 SP1 supported
  • ECL (External Content Library)
  • Workflow bundles
  • Facebook Notifi...... I mean Tridion Notification (improved messaging/notification)
  • And my favorite....... "Checked-out Items" shortcut!!! (This will definitely make Content Porting a lot easier!)

Some misc screenshots:


Friday, January 25, 2013

Allowing "-" in Tridion Publication Path

Today we had a requirement where the publication path need to include a "-" for all locales. For example, we will need the publication path of an English site to have "en-US" and not "en_US"

However, by default, Tridion CMS does not allow for this to work. When trying to add a "-" you will get the following error:


Here's the work around:
  • Open \Tridion\bin\cm_xml_usr.xsd
  • Modify the <xsd:simpleType name="FilePath"> element to include "\-" in the XSD Pattern.
  • You will now see the following:
  • Restart Tridion COM+
Now you should be able to add a "-" to the Publication Path!

Monday, December 17, 2012

Adding User Credential to the TridionRsaKeyContainer

In order to make modification to the Tridion MMC Snap-in such as the database settings, your user account will need access to the TridionRsaKeyContainer.

Ever get this annoying "Access is denied" error when you tried to add yourself to the TridionRsaKeyContainer? I have plenty of times.....


I always thought that the original Administrator account who did the Tridion installation can grant this access. But what if the original user account that was used was deleted or the employee left the company? Then you're screwed........ ok, that's not true!

Here's a way around it with the use of Microsoft PSTools


2) Unzip the tools to somewhere on the server
3) Drop out to a command prompt and go to where PSTools is unzipped
4) Run:    psexec -i -s cmd.exe (This should open another command prompt window)
5) In the new command prompt windows, navigate to where aspnet_regiis is (should be in c:\Windows\Microsoft.Net\Framework64\v4.0.30319 
6) Run:   aspnet_regiis -pa "TridionRsaKeyContainer" "Domain\UserName"

SUCCESS! Access is granted!

Hope this helps if anyone ever run into this issue.

Kudos to Brandon Truong from SDL Support!

Tuesday, October 30, 2012

"Hello" PowerShell

Playing around with Windows PowerShell today. As usual, the first thing that people learn is the infamous "Hello World" program. So I tried scripting an array of string in PS (plus color!)

PS C:\> 0..15 | % {Write-Host -ForegroundColor $_ "HELLO Robert Jin!!!"}

Here's a breakdown of what's happening:
  • 0..15 - This is a range operator with an array of numbers from 0 to 15
  • Write-Host - Operator to print text to the screen
  • -ForegroundColor - The color of the text
  • $_ - The numeric value that is required for the the previous command (ForegroundColor)
  • "<String>" - The string of text to display
ForegroundColor also have a few pre-set color schemes. Here's the list:

-ForegroundColor 0 = Black
-ForegroundColor 1 = Dark Blue
-ForegroundColor 2 = Dark Green
-ForegroundColor 3 = Dark Cyan
-ForegroundColor 4 = Dark Red
-ForegroundColor 5 = Dark Magenta
-ForegroundColor 6 = Dark Yellow (Not sure why this is showing as 'White')
-ForegroundColor 7 = Gray
-ForegroundColor 8 = Dark Gray
-ForegroundColor 9 = Blue
-ForegroundColor 10 = Green
-ForegroundColor 11 = Cyan
-ForegroundColor 12 = Red
-ForegroundColor 13 = Magenta
-ForegroundColor 14 = Yellow
-ForegroundColor 15 = White

Well, that's it for now =)

Thursday, October 25, 2012

Connecting to Tridion Core Service

Today marks the first day of me learning about the Tridion Core Service! First let's step through how to connect (remotely from the server as a client)

  • Open Visual Studio and create a new Windows Console project
  • Add Tridion.ContentManager.CoreService.Client.dll as a reference in the solution
  • Add Systems.ServiceModel and System.Runtime.Serialization as a reference in the solution
  • Make sure the project is running .NET Framework 4.0
  • Create an app.config file with the content from Tridion.ContentManager.CoreService.Client.config and update the netTcp_2011 address with the appropriate server IP
<?xml version="1.0"?>
<configuration>
  <system.serviceModel>
    <!-- Default/example WCF settings for Core Service. These settings should be copied into the host application's configuration file. -->
    <bindings>
      <!-- Default Core Service binding settings are provided here. These can be used as a starting point for further customizations. -->
      <basicHttpBinding>
        <binding name="basicHttp" maxReceivedMessageSize="10485760">
          <readerQuotas maxStringContentLength="10485760" maxArrayLength="10485760"/>
          <security mode="TransportCredentialOnly">
            <!-- For LDAP or SSO authentication of transport credentials, use clientCredentialType="Basic" -->
            <transport clientCredentialType="Windows"/>
          </security>
        </binding>
        <binding name="streamDownload_basicHttp" maxReceivedMessageSize="209715200" transferMode="StreamedResponse" messageEncoding="Mtom" sendTimeout="00:10:00">
          <security mode="TransportCredentialOnly">
            <!-- For LDAP or SSO authentication of transport credentials, use clientCredentialType="Basic" -->
            <transport clientCredentialType="Windows"/>
          </security>
        </binding>
        <binding name="streamUpload_basicHttp" maxReceivedMessageSize="209715200" transferMode="StreamedRequest" messageEncoding="Mtom" receiveTimeout="00:10:00">
          <security mode="None"/>
        </binding>
      </basicHttpBinding>
      <wsHttpBinding>
        <binding name="wsHttp" transactionFlow="true" maxReceivedMessageSize="10485760">
          <readerQuotas maxStringContentLength="10485760" maxArrayLength="10485760"/>
          <security mode="Message">
            <message clientCredentialType="Windows"/>
          </security>
        </binding>
      </wsHttpBinding>
      <netTcpBinding>
        <binding name="netTcp" transactionFlow="true" transactionProtocol="WSAtomicTransaction11" maxReceivedMessageSize="10485760">
          <readerQuotas maxStringContentLength="10485760" maxArrayLength="10485760"/>
        </binding>
        <binding name="streamDownload_netTcp" maxReceivedMessageSize="2147483647" transferMode="StreamedResponse" sendTimeout="00:10:00"/>
        <binding name="streamUpload_netTcp" maxReceivedMessageSize="2147483647" transferMode="StreamedRequest" receiveTimeout="00:10:00"/>
      </netTcpBinding>
    </bindings>
    <client>
      <!-- Default Core Service endpoint settings are provided here. The endpoint name should be specified when constructing a proxy service instance.
      The mapping between proxy service types and applicable endpoint names is as follows (see also the contracts specified on each endpoint):
      CoreServiceClient: basicHttp
      SessionAwareCoreServiceClient: wsHttp, netTcp
      StreamDownloadClient: streamDownload_basicHttp, streamDownload_netTcp
      StreamUploadClient: streamUpload_basicHttp, streamUpload_netTcp
      -->
      <endpoint name="basicHttp_2011" address="http://10.9.5.48/webservices/CoreService2011.svc/basicHttp" binding="basicHttpBinding" bindingConfiguration="basicHttp" contract="Tridion.ContentManager.CoreService.Client.ICoreService"/>
      <endpoint name="streamDownload_basicHttp_2011" address="http://10.9.5.48/webservices/CoreService2011.svc/streamDownload_basicHttp" binding="basicHttpBinding" bindingConfiguration="streamDownload_basicHttp" contract="Tridion.ContentManager.CoreService.Client.IStreamDownload"/>
      <endpoint name="streamUpload_basicHttp_2011" address="http://10.9.5.48/webservices/CoreService2011.svc/streamUpload_basicHttp" binding="basicHttpBinding" bindingConfiguration="streamUpload_basicHttp" contract="Tridion.ContentManager.CoreService.Client.IStreamUpload"/>
      <endpoint name="wsHttp_2011" address="http://10.9.5.48/webservices/CoreService2011.svc/wsHttp" binding="wsHttpBinding" bindingConfiguration="wsHttp" contract="Tridion.ContentManager.CoreService.Client.ISessionAwareCoreService">
        <identity>
          <dns value="localhost"/>
        </identity>
      </endpoint>
      <endpoint name="netTcp_2011" address="net.tcp://10.9.5.48:2660/CoreService/2011/netTcp" binding="netTcpBinding" bindingConfiguration="netTcp" contract="Tridion.ContentManager.CoreService.Client.ISessionAwareCoreService"/>
      <endpoint name="streamDownload_netTcp_2011" address="net.tcp://localhost:2660/CoreService/2011/streamDownload_netTcp" binding="netTcpBinding" bindingConfiguration="streamDownload_netTcp" contract="Tridion.ContentManager.CoreService.Client.IStreamDownload"/>
      <endpoint name="streamUpload_netTcp_2011" address="net.tcp://localhost:2660/CoreService/2011/streamUpload_netTcp" binding="netTcpBinding" bindingConfiguration="streamUpload_netTcp" contract="Tridion.ContentManager.CoreService.Client.IStreamUpload"/>
    </client>
  </system.serviceModel>
<startup><supportedRuntime version="v4.0" sku=".NETFramework,Version=v4.0"/></startup></configuration>
  • Write the following code:
using System;
using System.Collections.Generic;
using System.Linq;
using System.Text;
using Tridion.ContentManager.CoreService.Client;

namespace CoreService
{
    class Program
    {
        static void Main(string[] args)
        {
            // Connecting to Core Service
            var client = new SessionAwareCoreServiceClient("netTcp_2011");
            client.ChannelFactory.Credentials.Windows.ClientCredential = new System.Net.NetworkCredential("administrator", "tridion");
            Console.WriteLine("Connected to CoreService with user " + client.GetCurrentUser().Title);
            Console.Read();
        }
    }
}